In the previous post about free tier cloud I hinted that I am a heavy user of Cloudflare for a long time and I will be using Cloudflare a lot on my projects on this site. So Let's start with adding Cloudflare to our website. Now you may ask, A how to guide! again? Well, in this guide, I added a lots of photos so even a non technical person can easily follow it. Also I have added all the initial settings you should change to get the most out of Cloudflare, which I learned with trials and errors over years. So it might help you even you are already using it.
Adding your domain name to Cloudflare.
To add your website to Cloudflare you need to change your nameserver to Cloudflare (details below). Cloudflare will proxy your whole website and not only act as a CDN but also hide your origin IP, and protect your origin server from DDOS attacks, all for free. To get started go to Cloudflare Dashboard and signup.
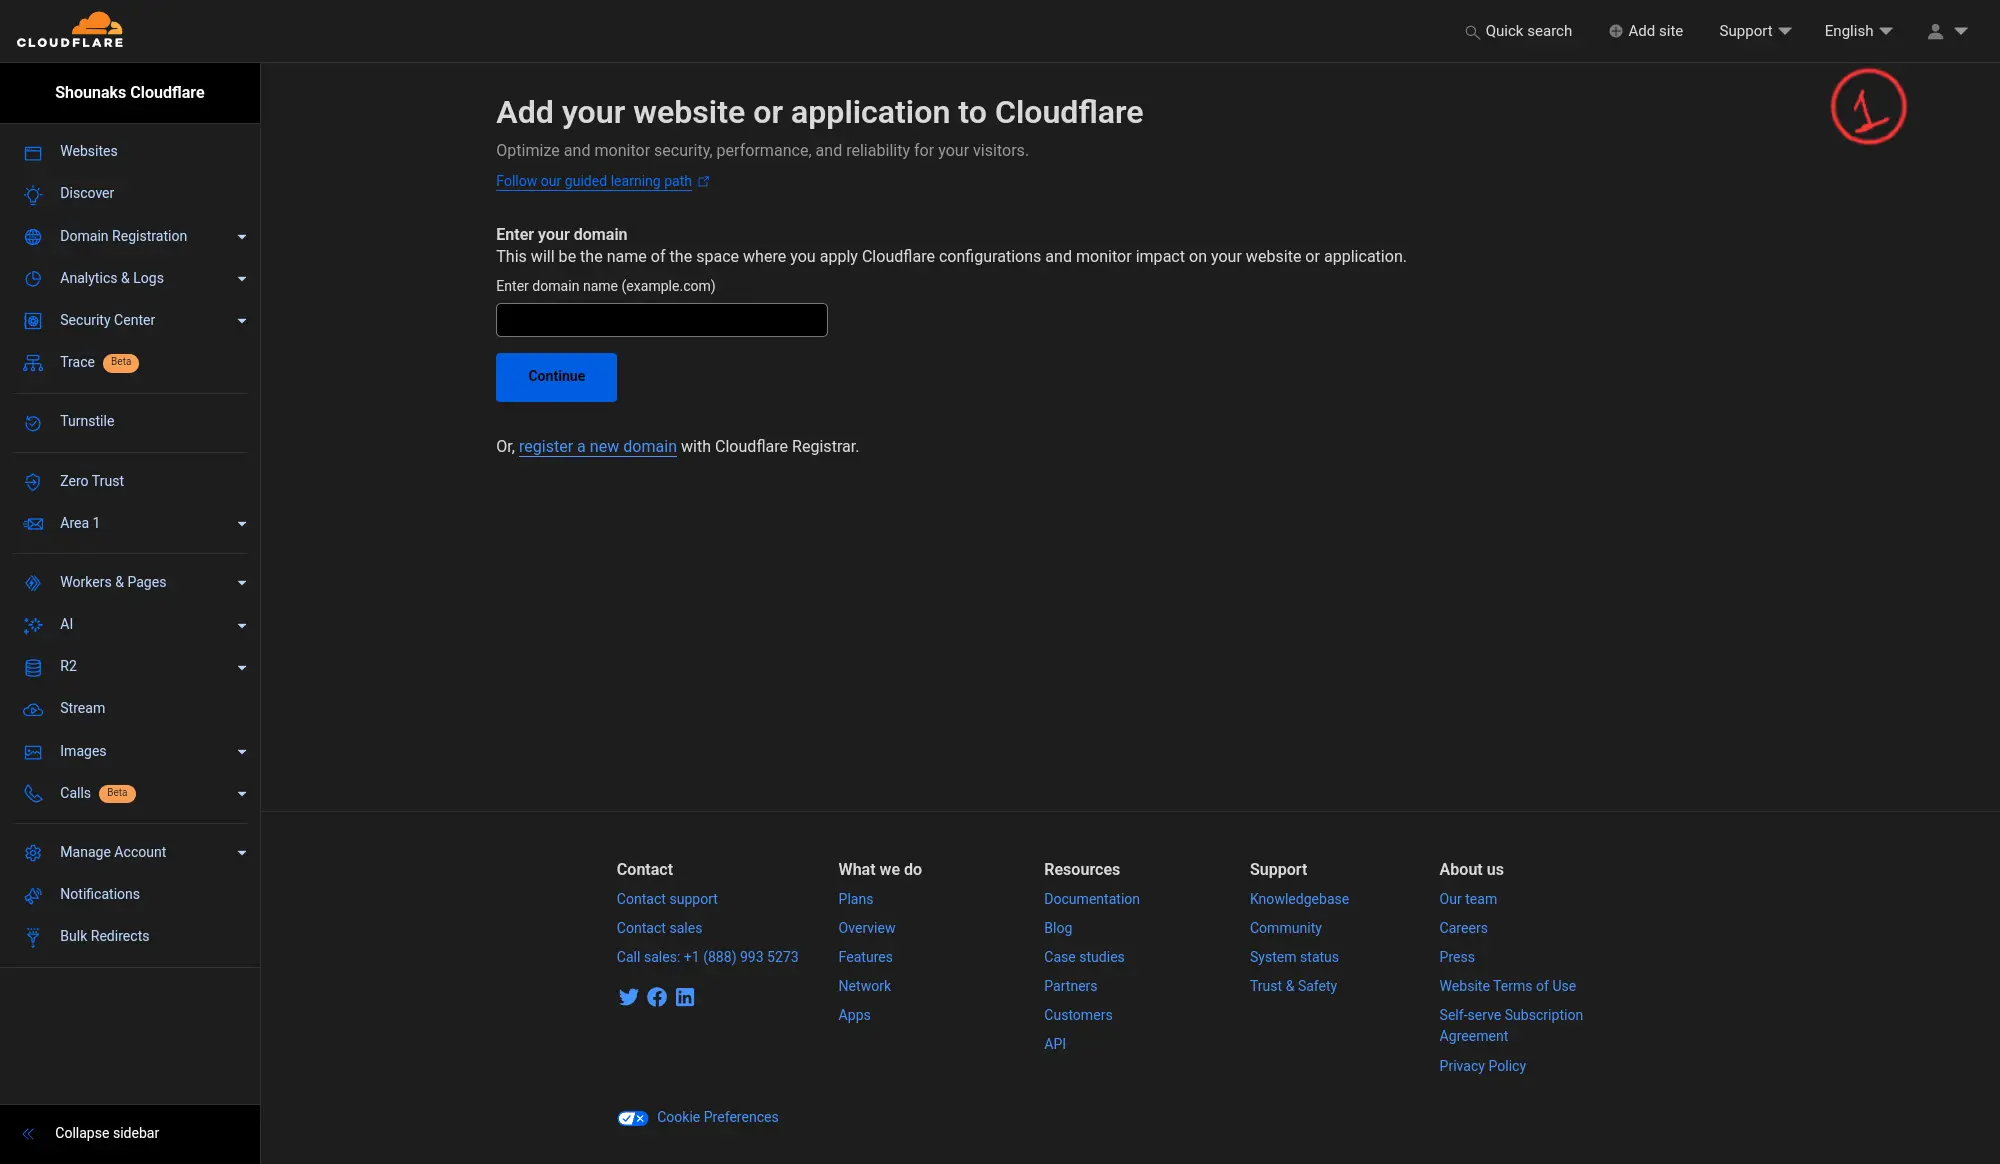
Then follow these 4 steps ( I have added images for better explanation):
- Add your domain name and press continue.
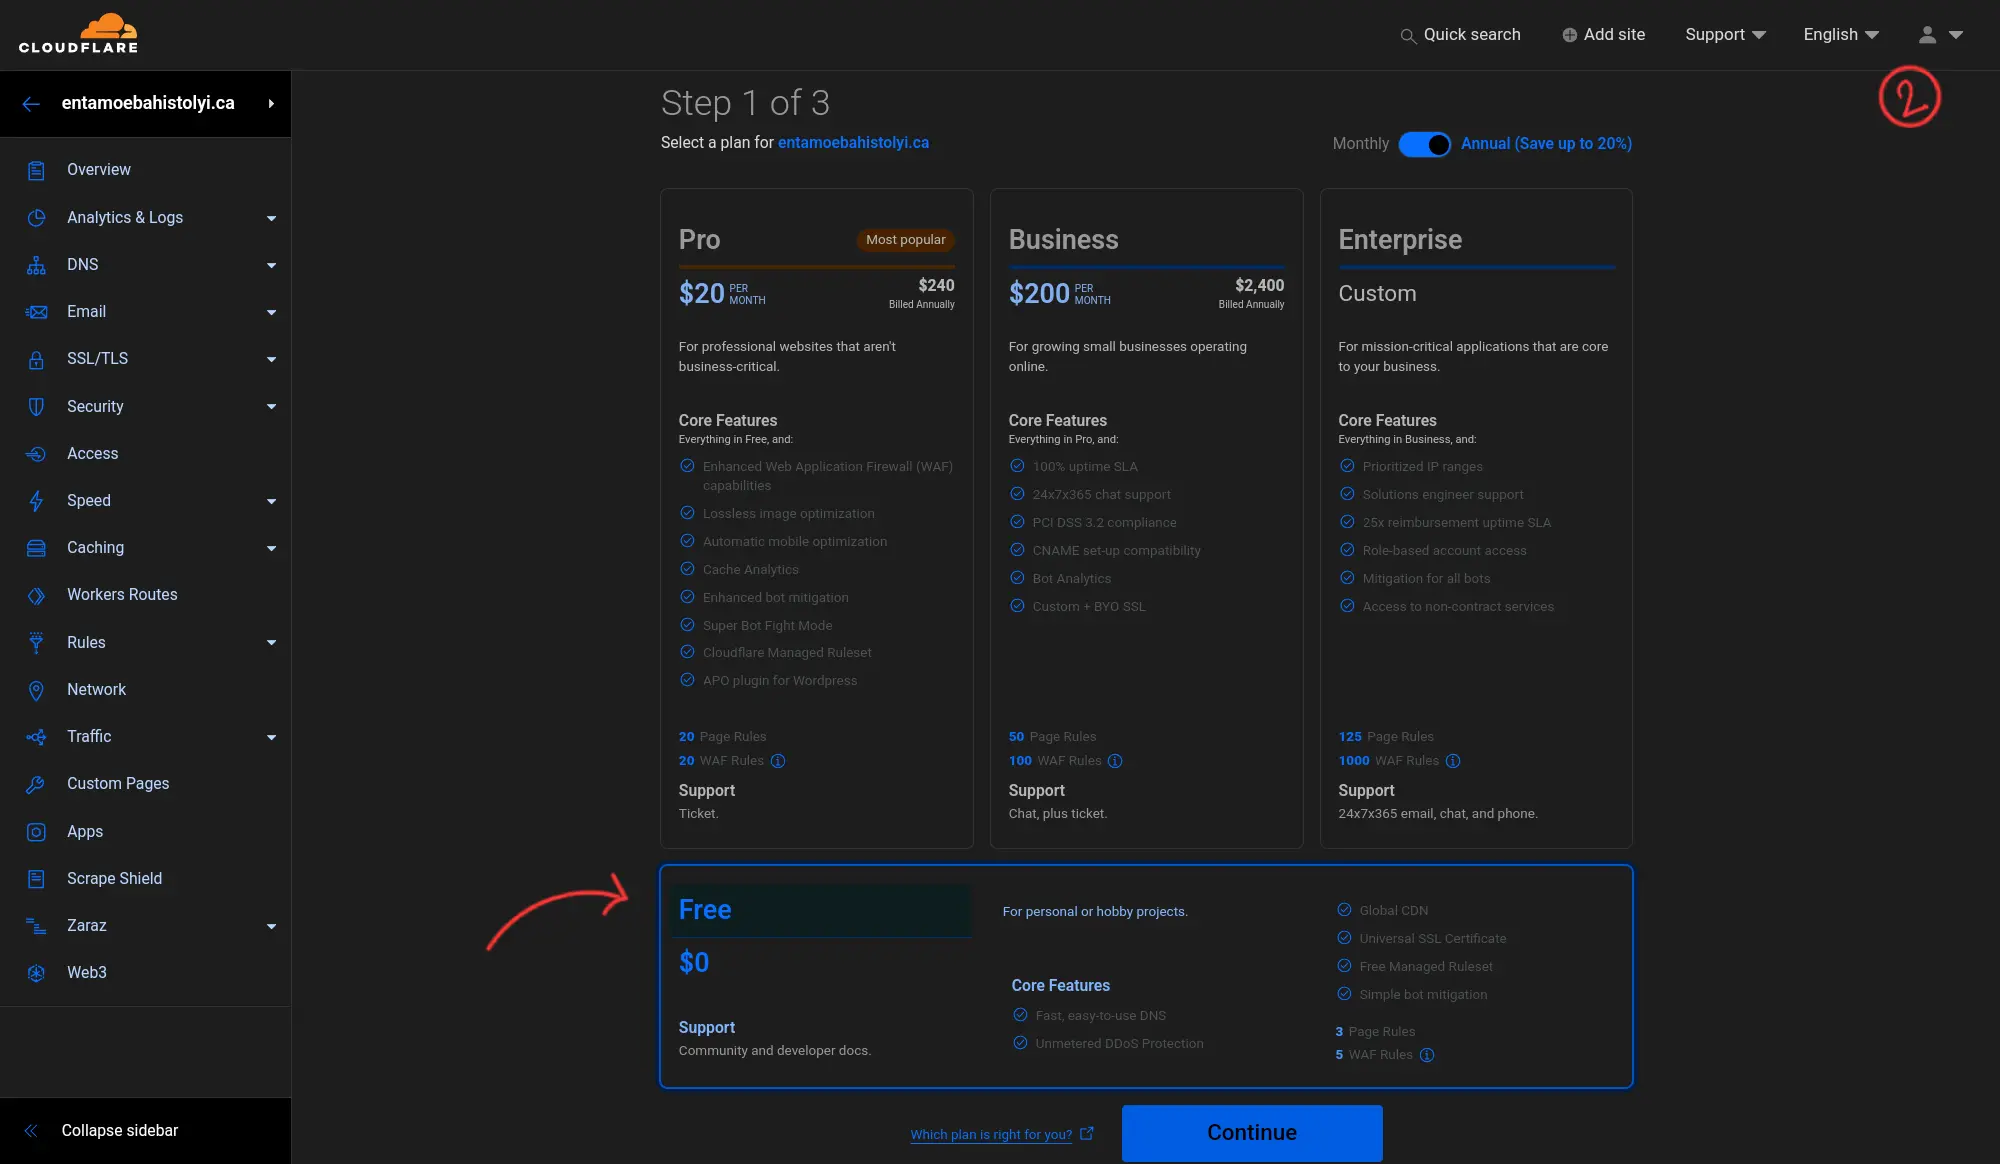
- Select free plan and proceed.
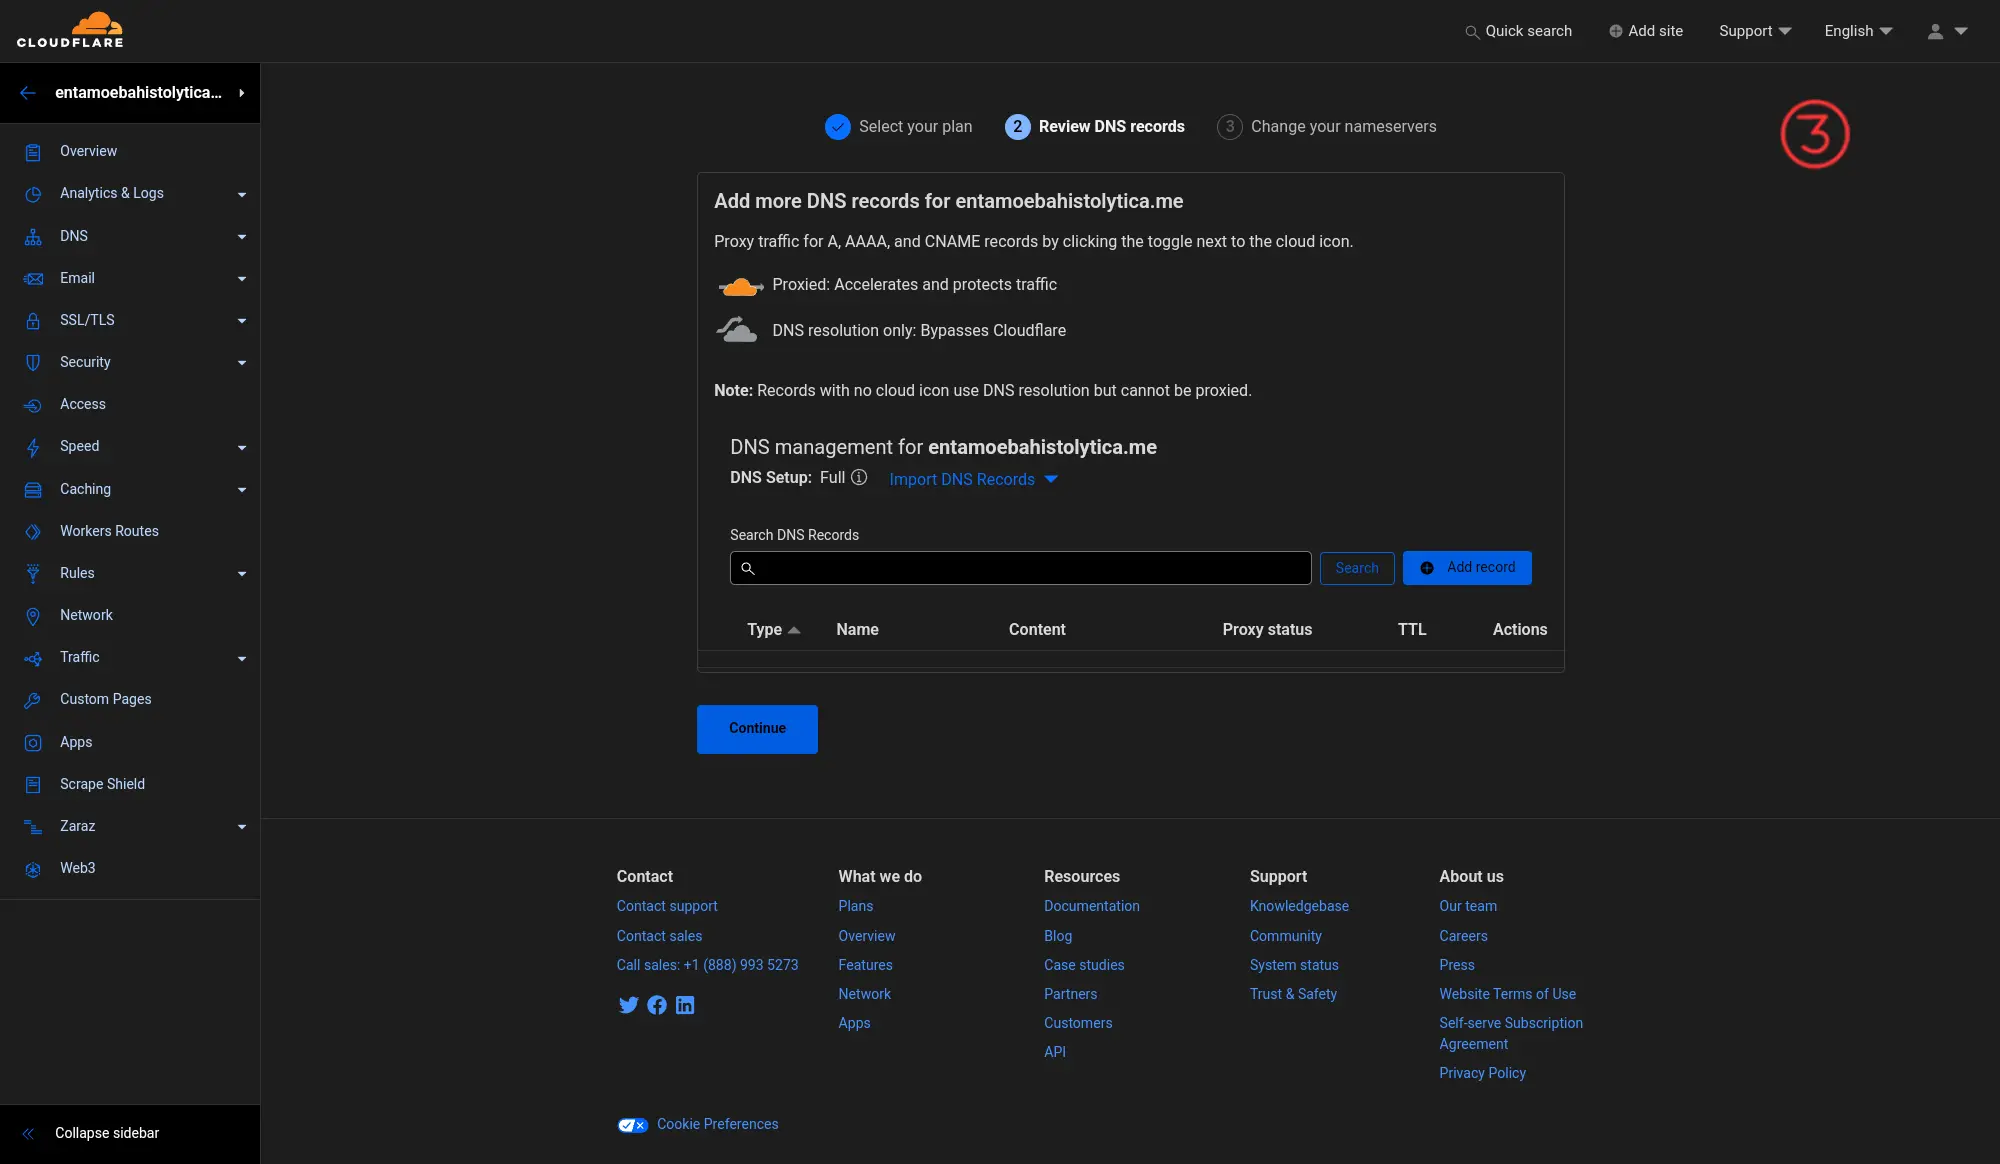
- If you have existing dns records (at your domain registrar), Cloudflare will automatically pull them. Check the records and if anything is missing add that and proceed.
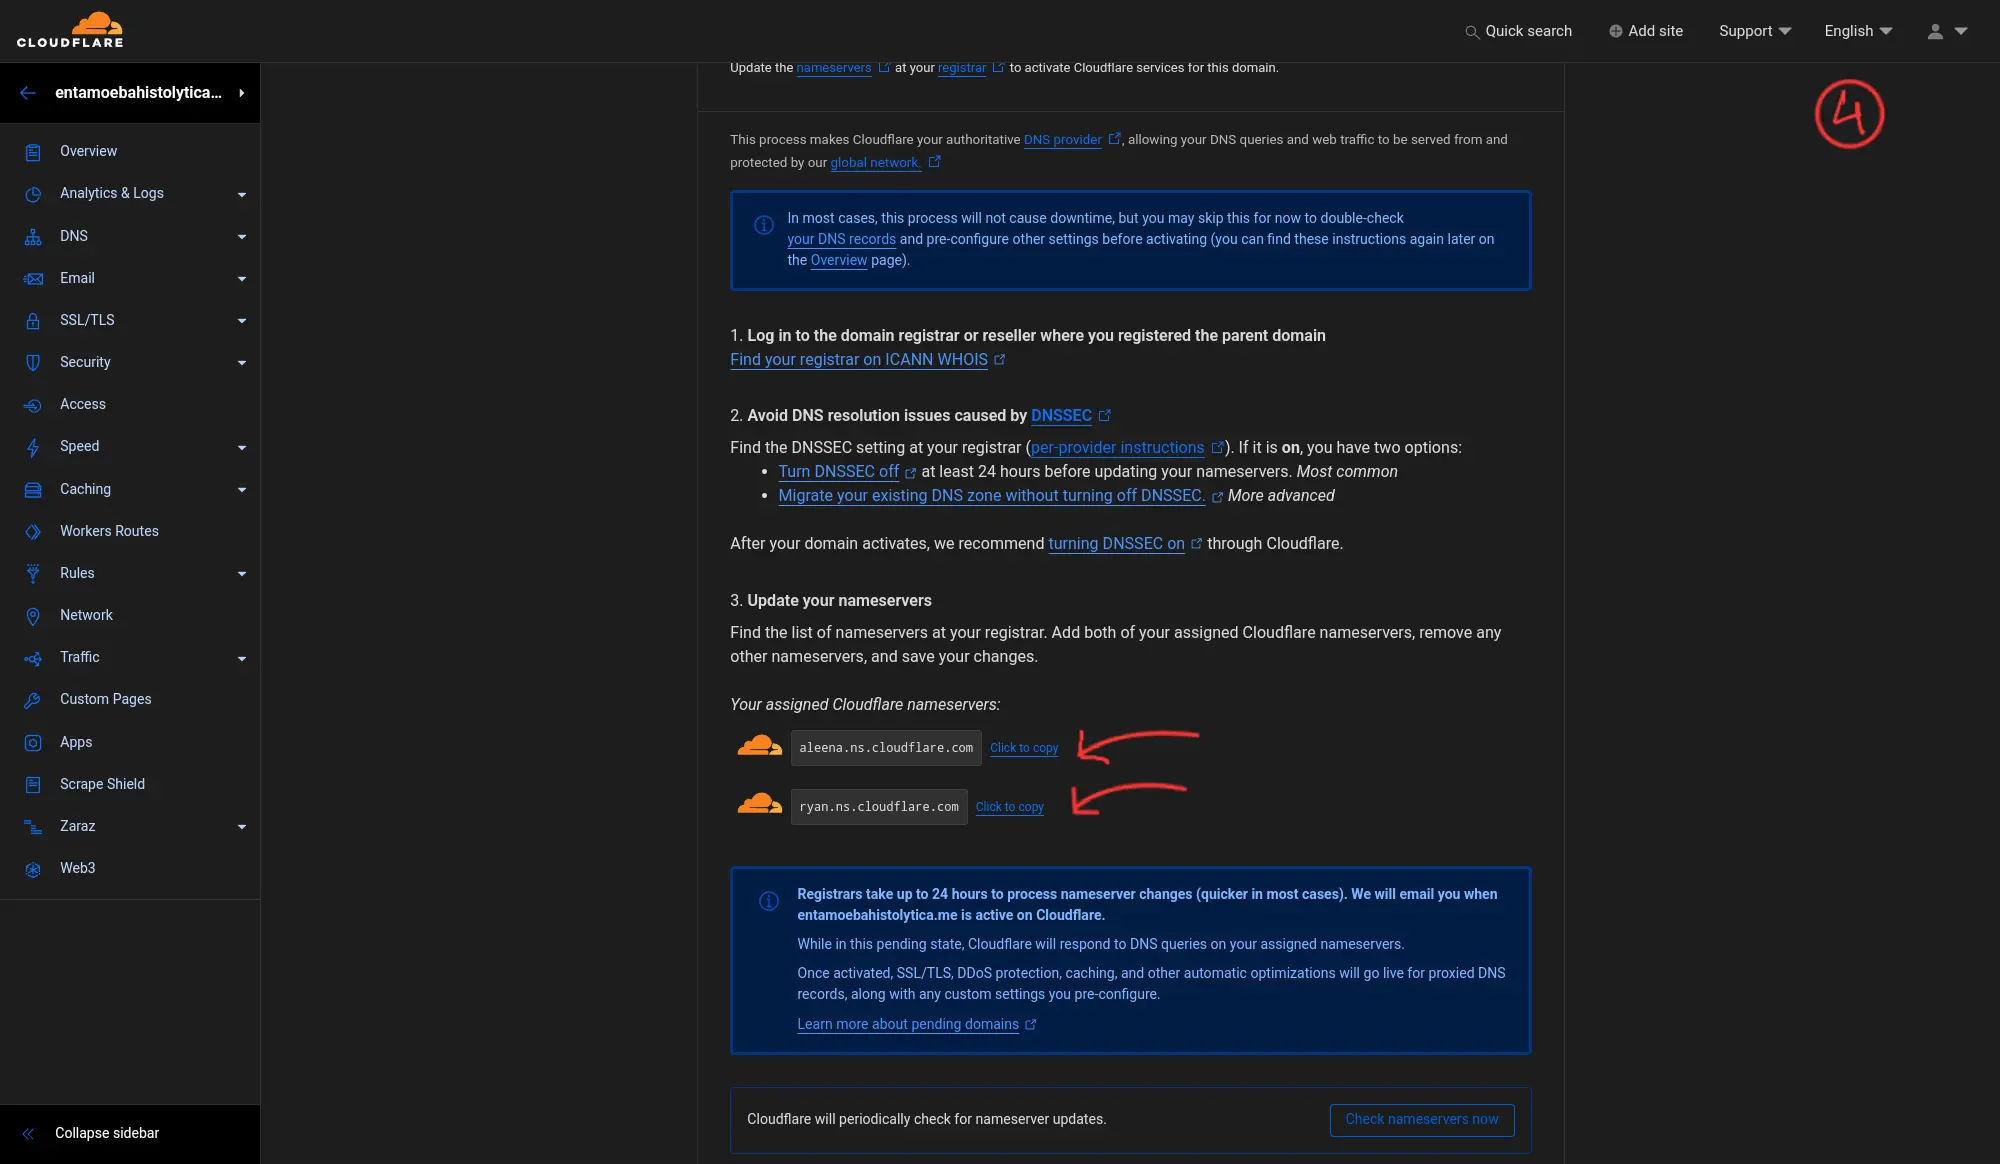
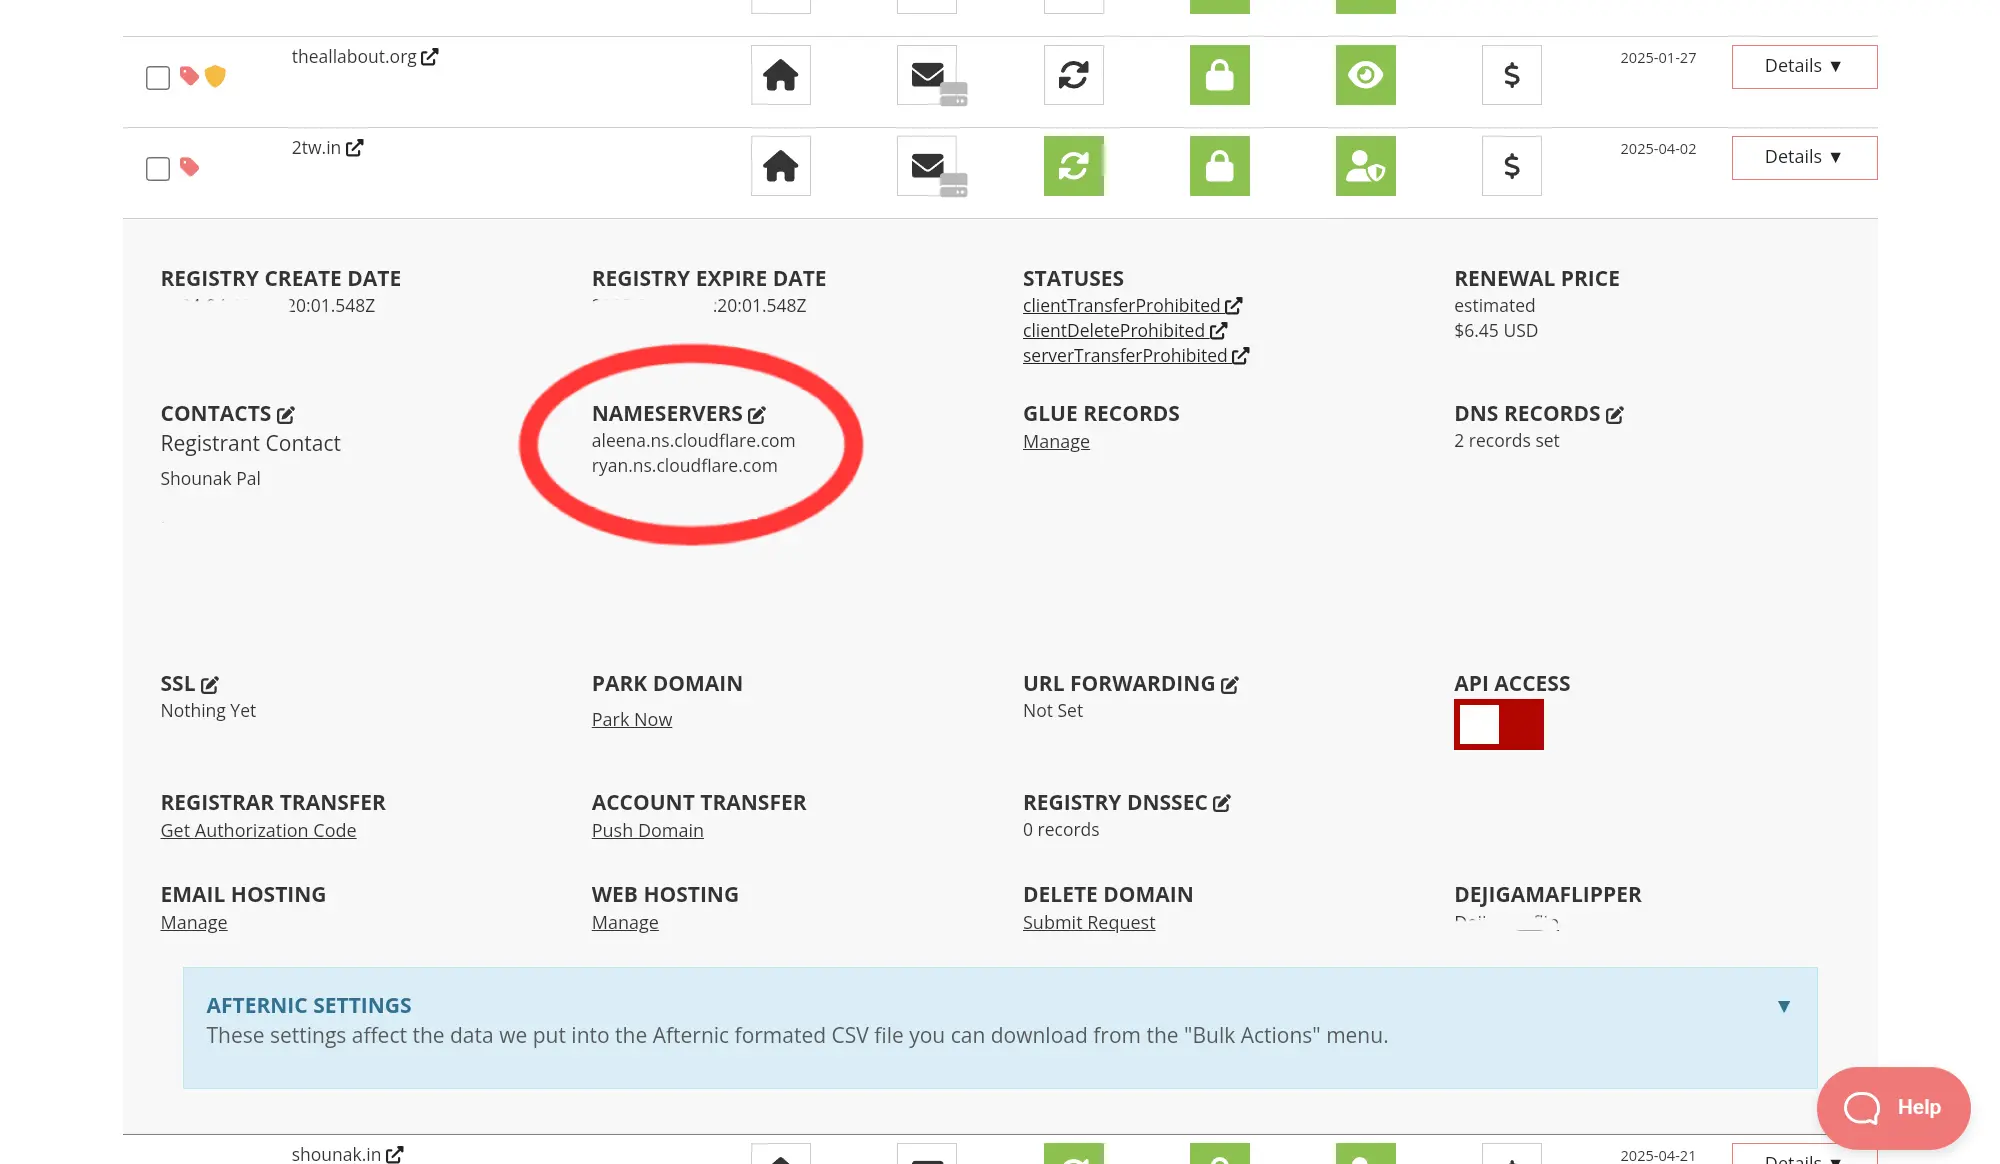
- You will get two nameservers like bob.ns.cloudflare.com. Go to your domain registrar, from whom you bought the domain. Like GoDaddy, Namecheap, Squarespace or Porkbun (used here). You will find a "change nameserver" option. Remove those name servers and add the Cloudflare provided ones. Then come back to Cloudflare and press "check nameservers". Now sit back and relax, It takes time. Cloudflare will send you an email when it is completed.
Here are the screenshots of every steps:
Now finish the rest of the prompts as asked by Cloudflare and you site is now live. Try accessing your site, you should be able to normally. But sometimes you may get an SSL error. Let's fix that along with other settings.
Initial settings for Proper Optimisation.
First let's correct the SSL thing, others can wait. You should modify the settings irrespective of whether you get an error or not. Note: you may have some different opinions to some of my settings which is okay, these settings works best with my setup and in my opinion should work better in most setups, but there are always some exceptions.
🌟 SSL settings:
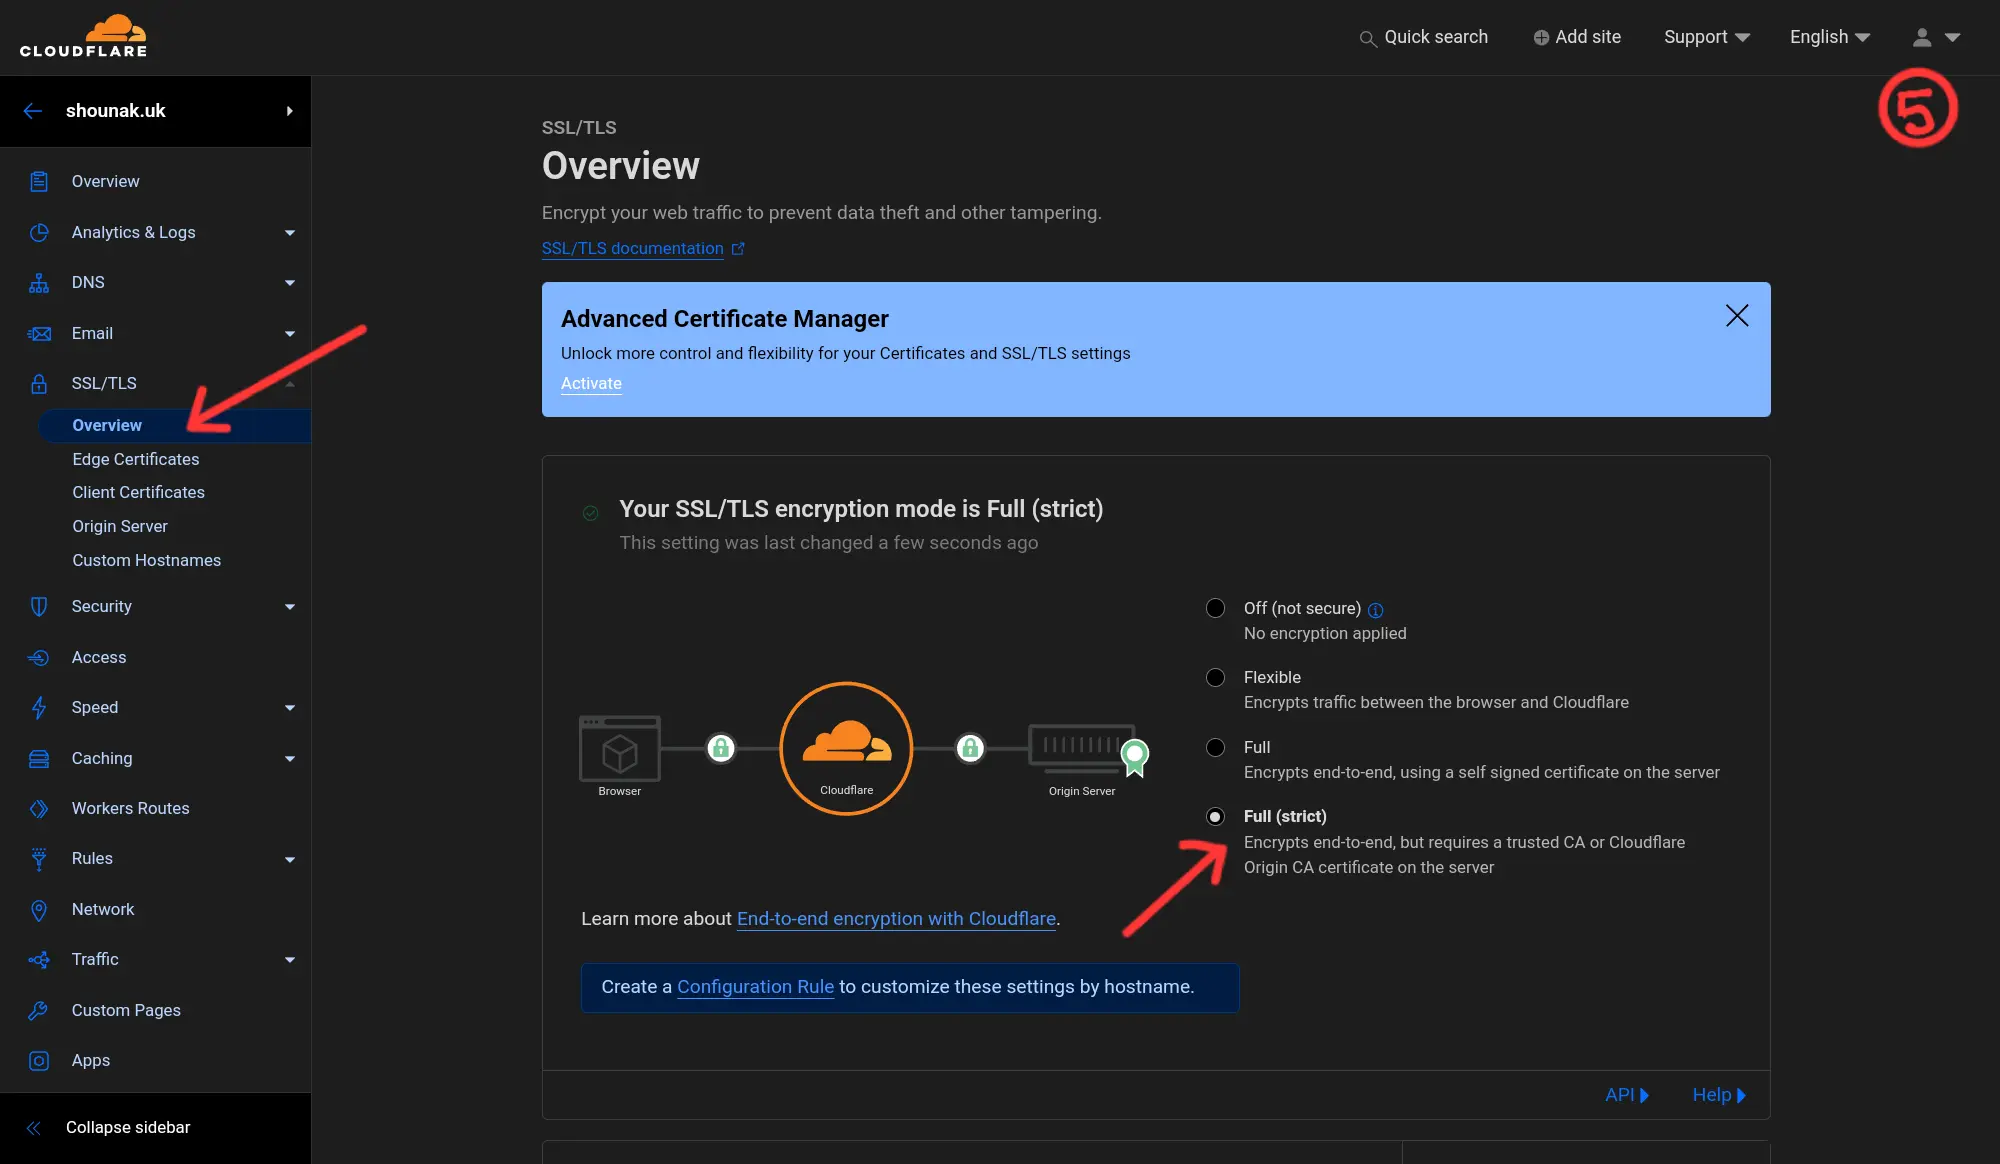
On the left sidebar you will find a SSL tab, where you will find overview. You should choose between two options:
- SSL full strict: It is the preferred option, provided you have installed a SSL certificate from Let's Encrypt on your server. The fact is if you get an error when accessing the site with this settings, don't use it. Otherwise use it.
- SSL Full: If you get error while using your website with the above settings, then use this option.
If you don't have SSL at your origin, then you should do that otherwise.
🌟 Cache Optimisation settings:
Caching is the key to increasing speed with CDN, if you don't cache properly you are wasting your origin resources, if you are caching very aggressively then that may also cause problems. So let's dive into Cloudflare's cache settings. And you will find images for every steps below.
The things we are going to change on the configuration page:
- Browser Cache TTL: Set to 'Respect existing Headers'. It may cause unnecessary problems. We can always set browser caching for static files in cache rules later. I will discuss this in a future post (subscribe to the free newsletter for a notification).
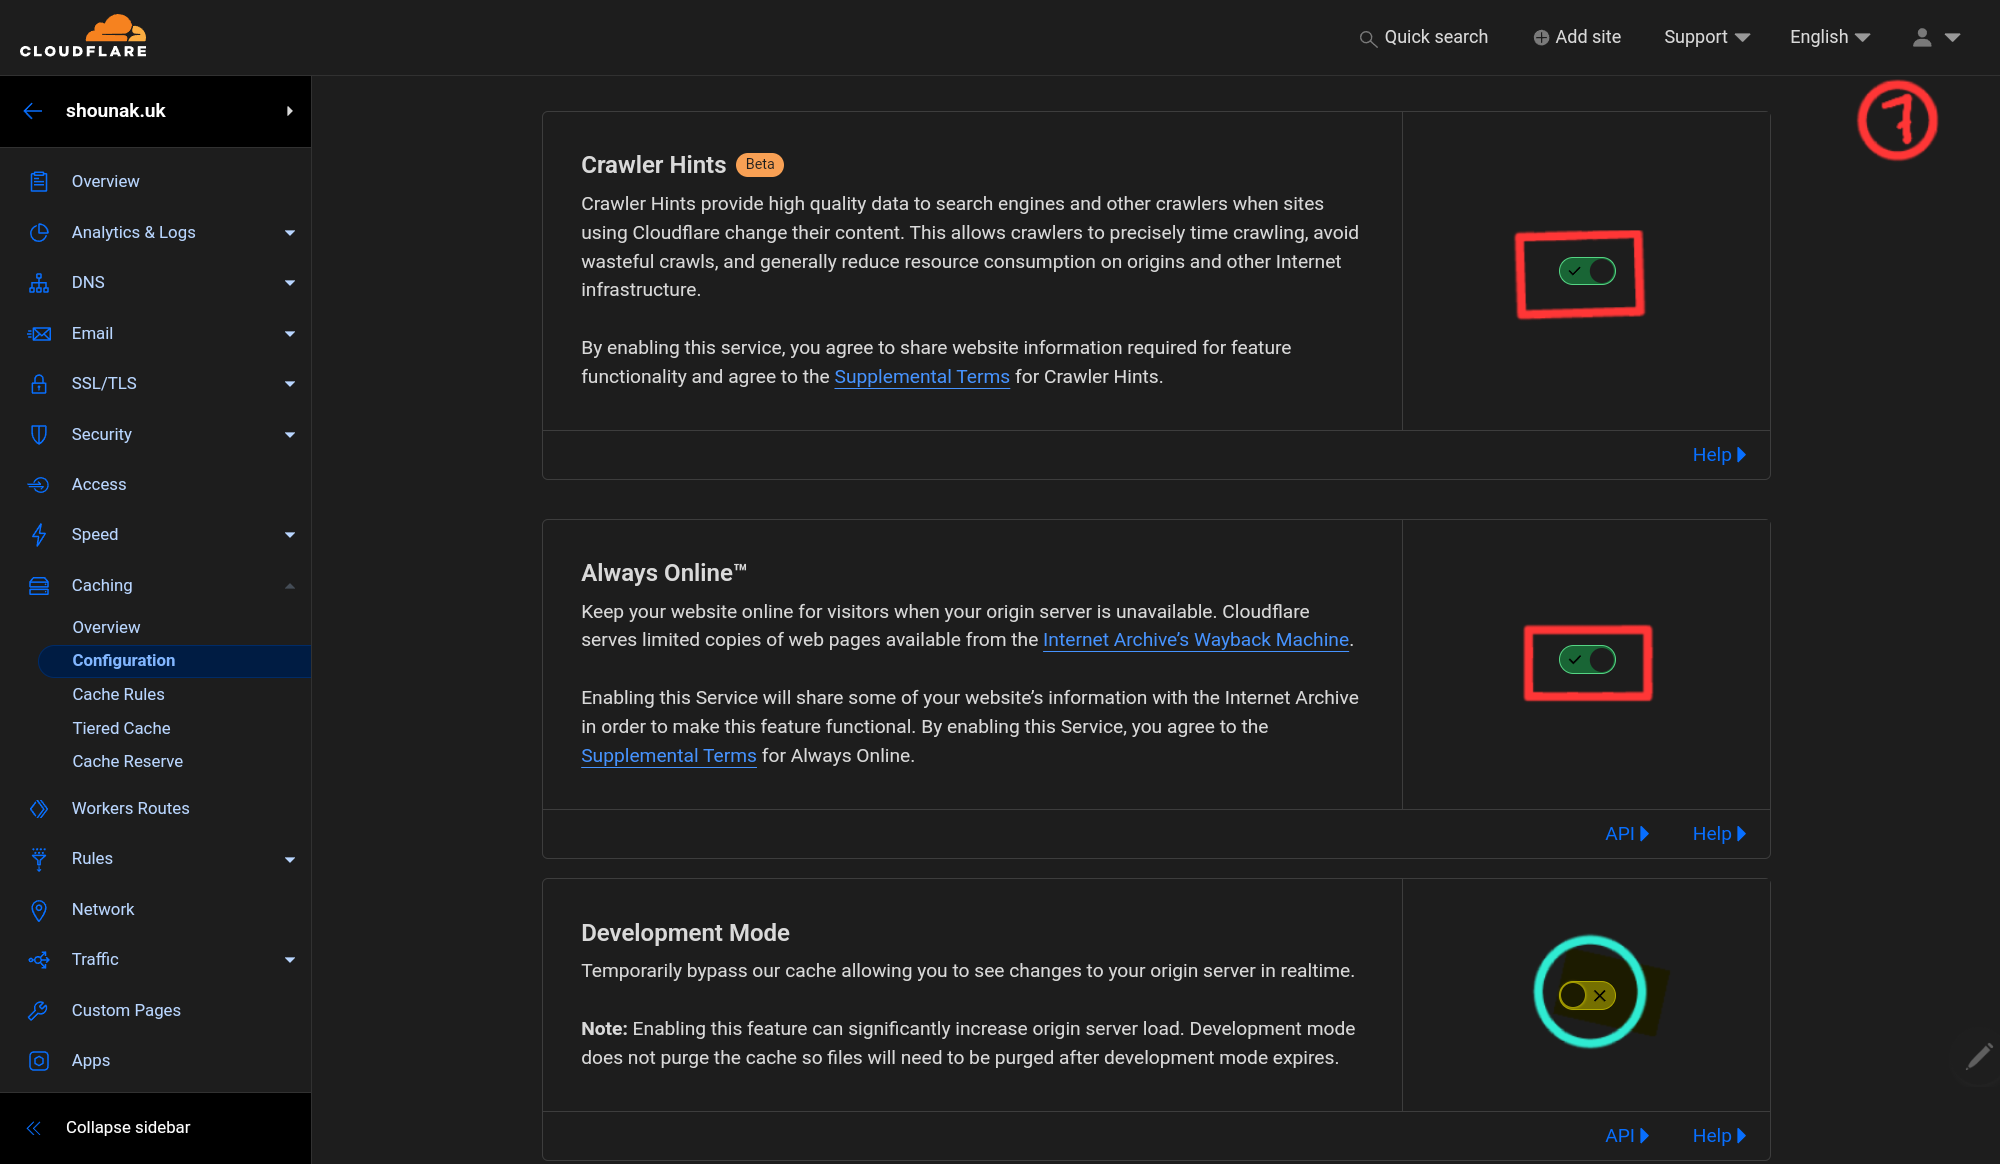
- Turn on Crawler Hints: It will automatically submit your newly published/changed pages to bing webmaster tools via 'IndexNow'.
- Turn on Always Online: Maintaining 99% uptime is relatively easy, but maintaining 99.9999% uptime is hard. You can avoid that downtime for your beloved readers (provided Cloudflare itself is up and running). This feature automatically saves a static snapshot of your webpage in the 'Internet Archive'. If your origin server is unavailable, cloudflare will serve the most recent snapshot of your website to the visitors till the origin comes back online.

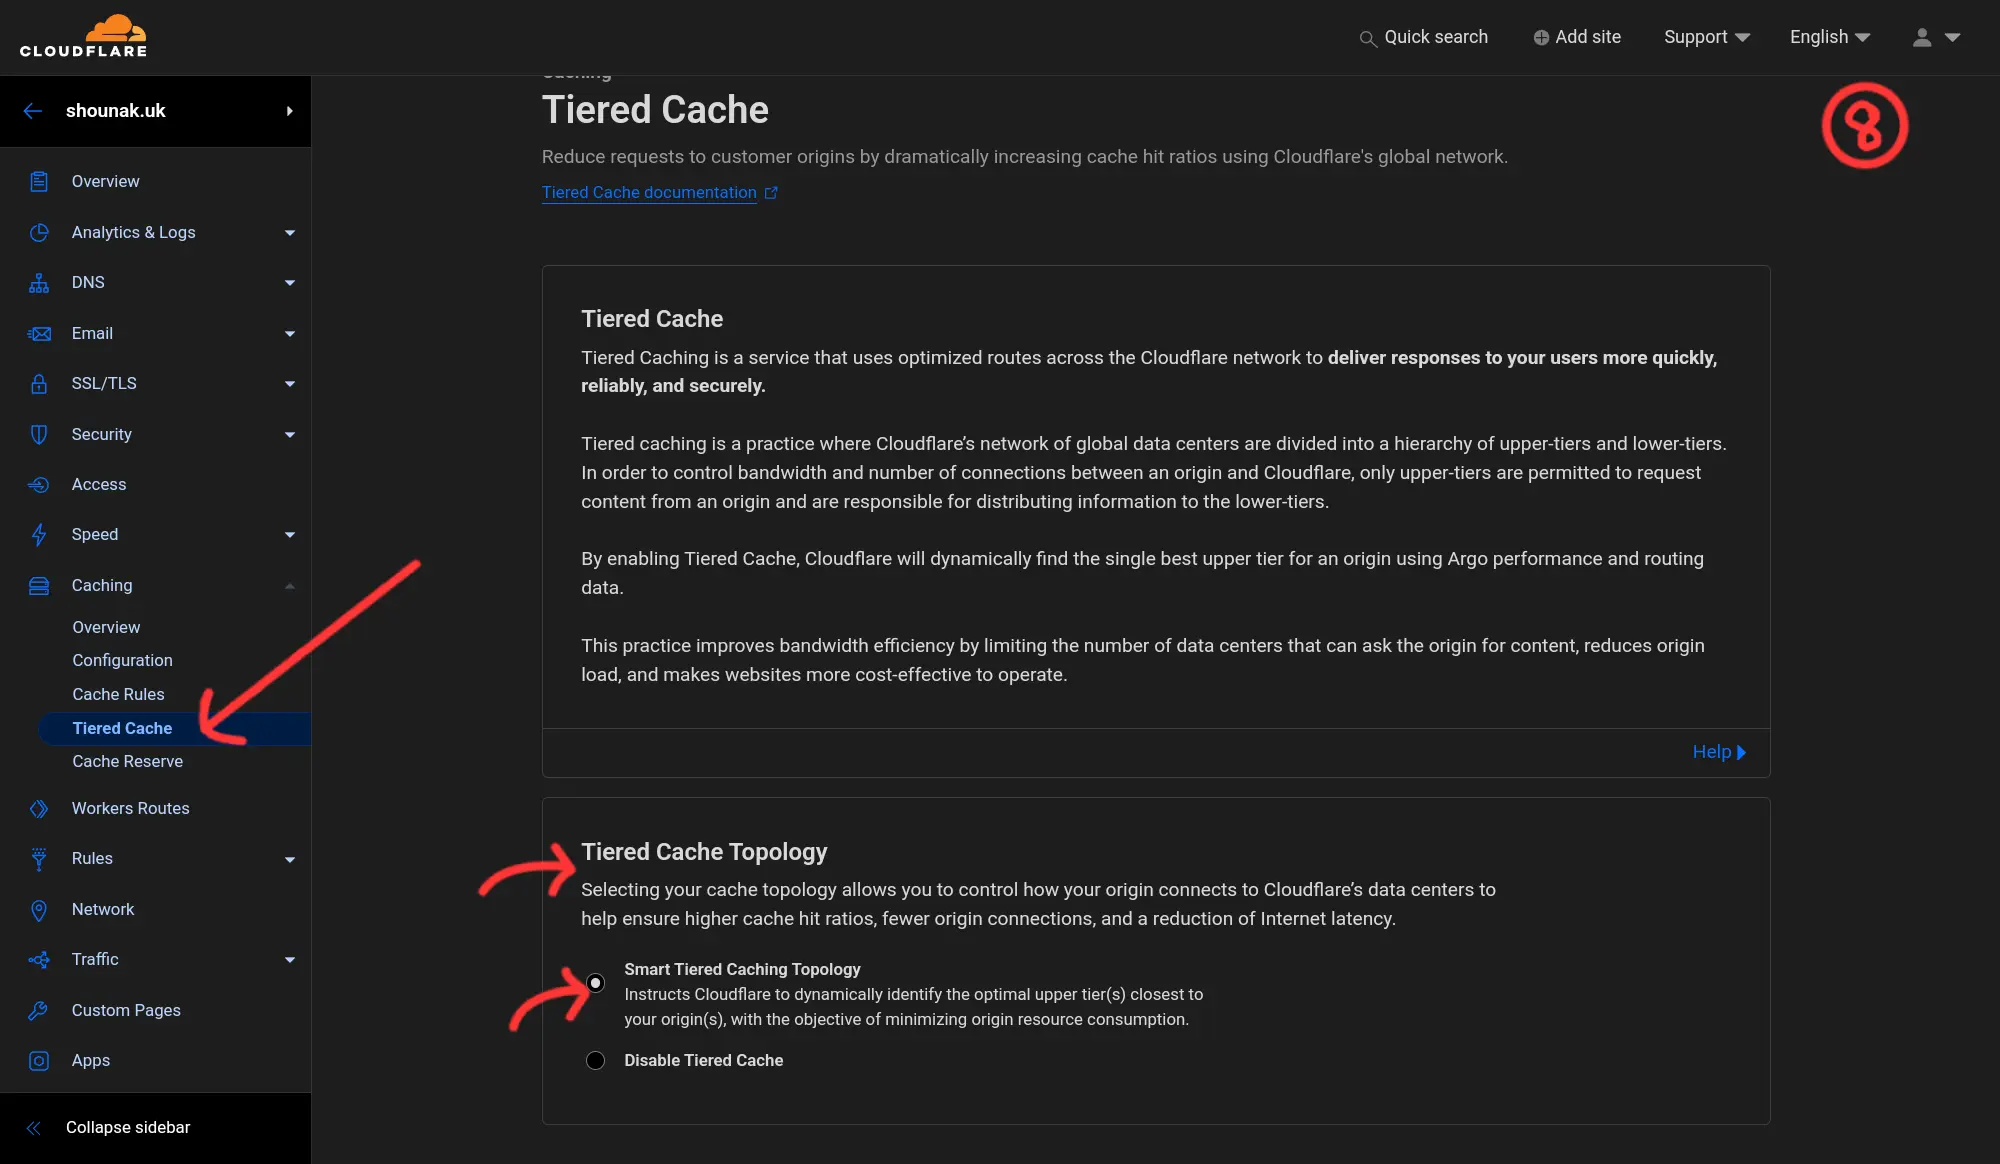
Tiered Cache settings page:
Now on the cache settings go to the tiered Cache option and select the Smart Tiered Topology. What it does is before hitting your origin for a cacheable but uncached request cloudflare scans all the edge nodes upto your origin and serves a cached content if it is present there.
For example let's say, your server is at USA, and a visitor is visiting it from Amsterdam(AMS) for the first time. So AMS don't have a cached copy. But another user from London (LHR) visited your site and LHR has caches. So when AMS has a cache miss instead of going all the way to US, Cloudflare fetches the cached copy form LHR and serves it to AMS.
Thus, it improves cache hit ratio and loading time, reducing strain on your origin.
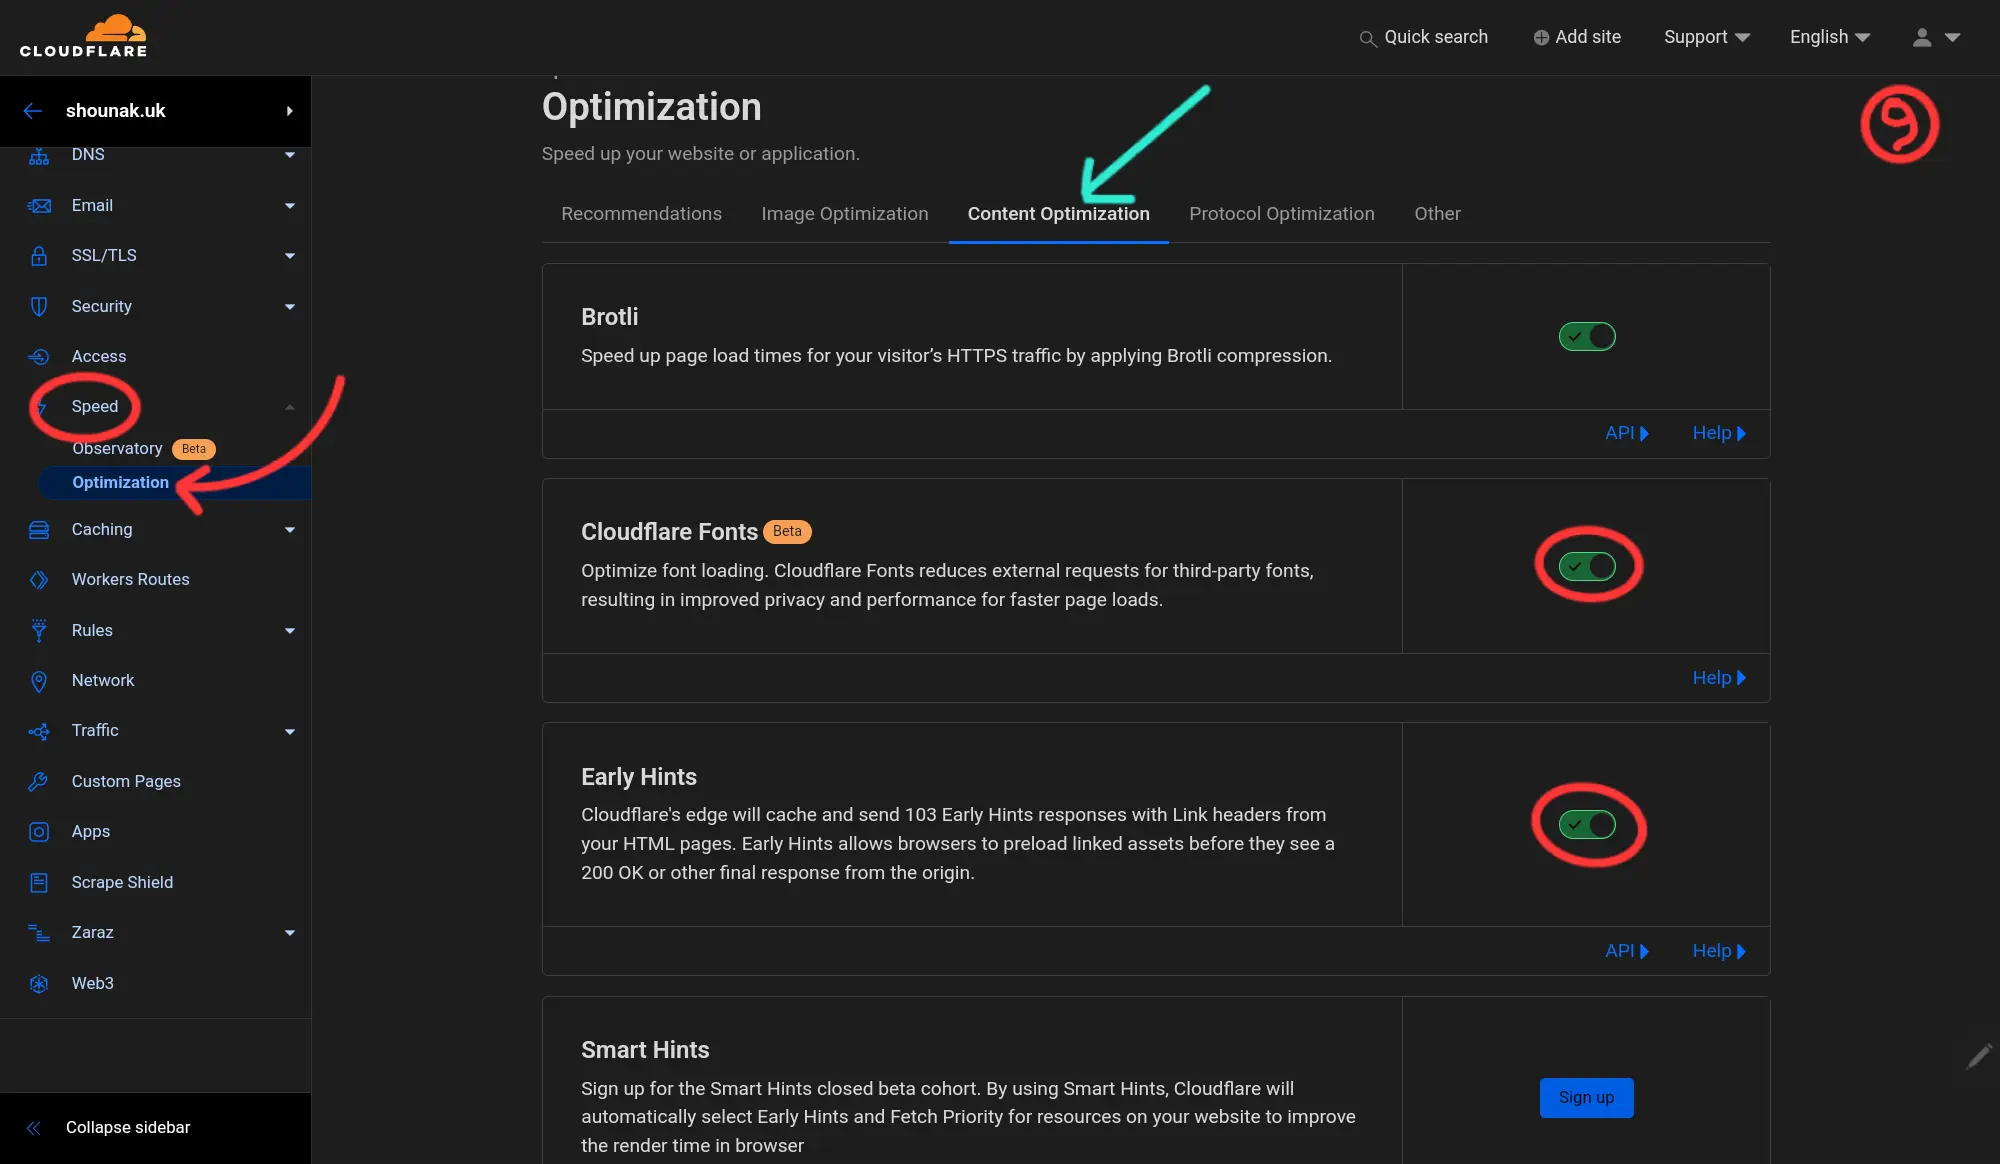
🌟 Content Optimization Settings:
Now that your website is running smoothly and getting cached by Cloudflare. Let's go for some further speed optimisations. And you will find the settings at the left sidebar menu under section "Speed" and "Optimisation"
In the optimisation page, image optimisation is a pro feature so I will skip that. First let's go to Content Optimization.
The settings you are going to change here are:
- Turn on Cloudflare fonts: It will replace the Google font URLs on your website to Cloudflare's URL. Cloudflare has far more data centers than Google and privacy friendly. So your fonts will load faster and with more privacy.
- Turn on Early Hints: Your website contains a lot of static assets, this settings help to pre connect and preload those assets improving page load time.
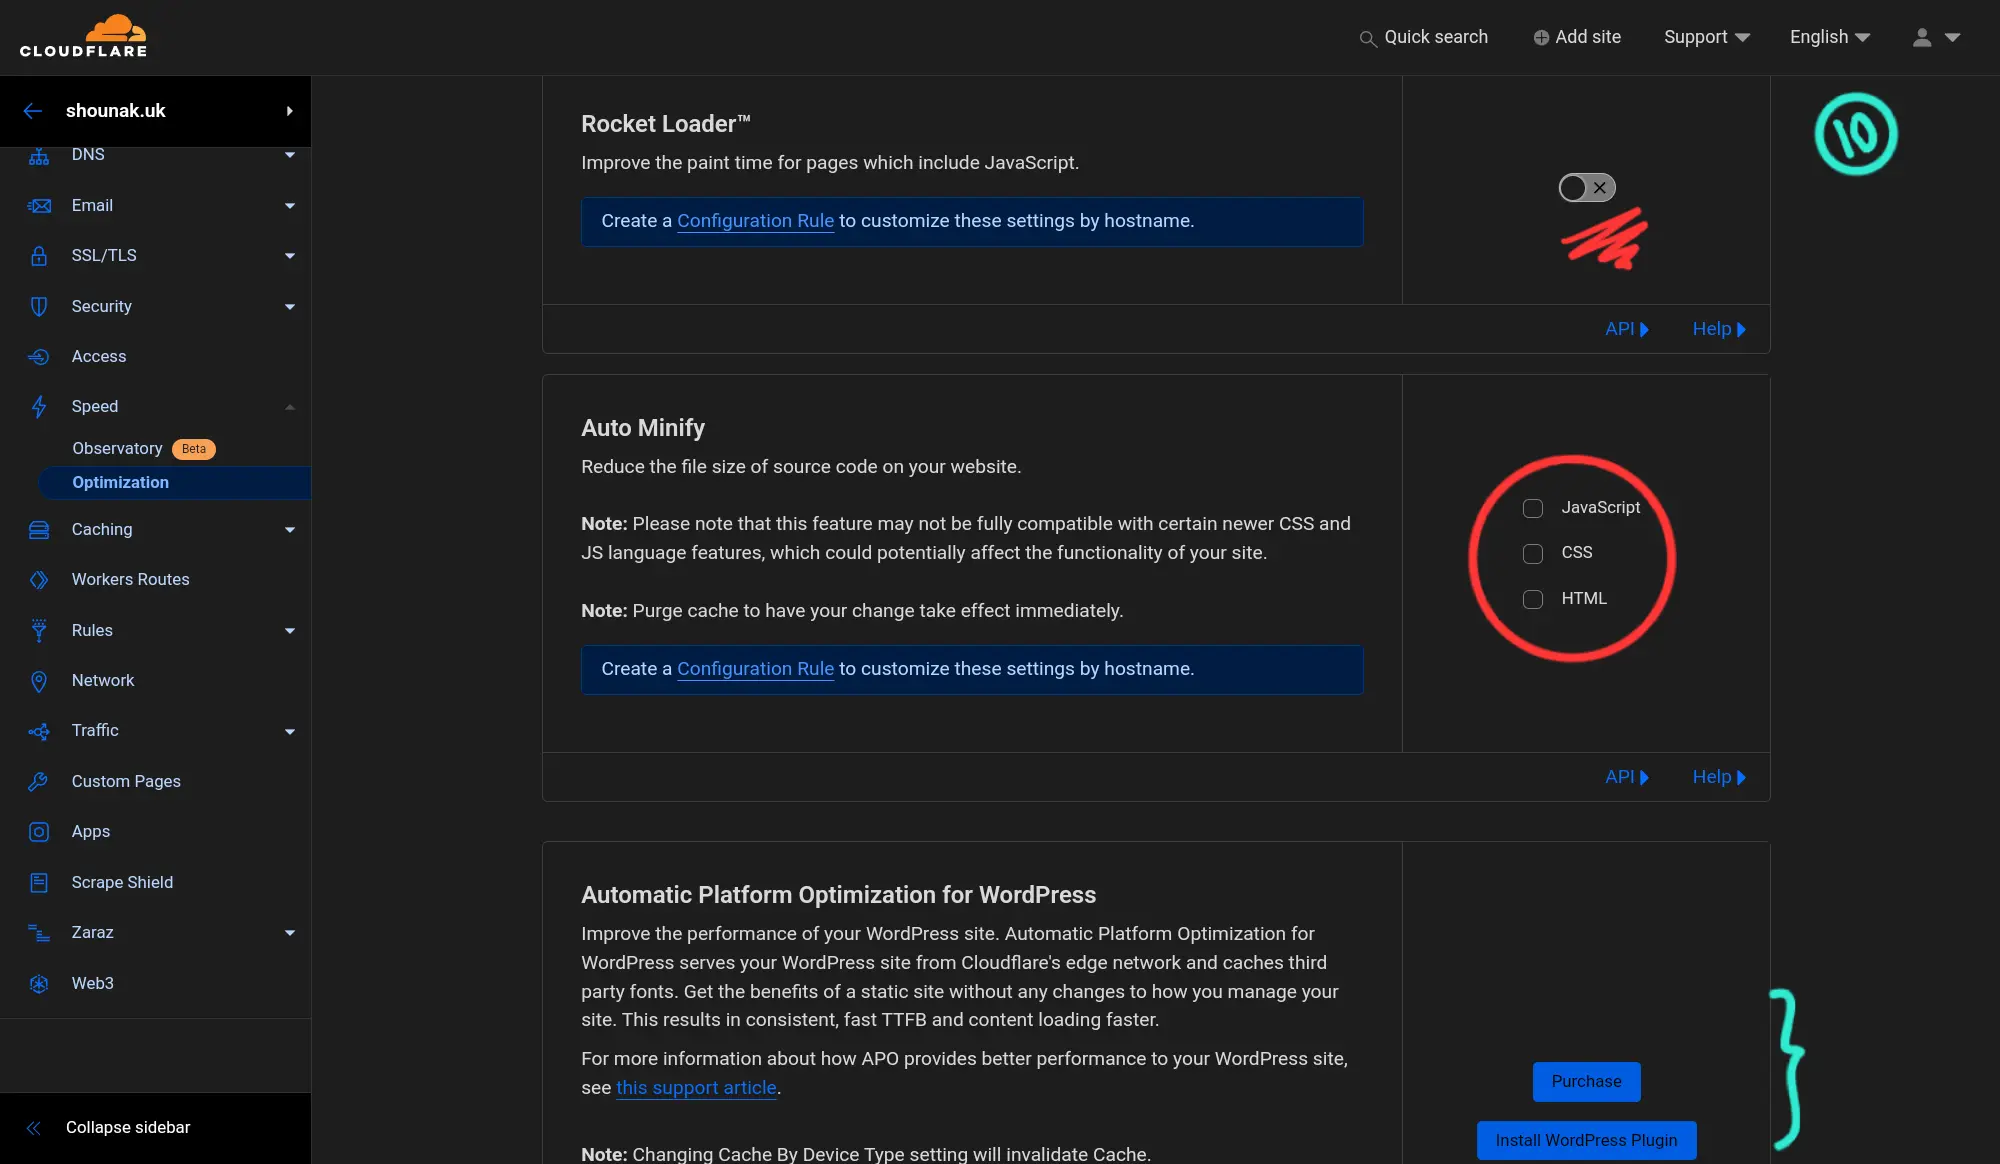
- Rocket Loader: Theoretically it makes your website faster by delaying external javascripts, but in reality this causes a lots of problems (like in Ghost blogs it messes up the nav bar). So I prefer to keep it disabled.
- Minify: The story is same as above, also if you are using WordPress you probably already minify at origin itself. I also keep them disabled but, if you want you can turn on minifying js and CSS.
- APO (Premium) : If you have a wordpress site (does not work with Ezoic) then you can try APO for 5 usd/ month. It makes your site super fast with some further techniques. (There will be a future post about APO and WordPress CDNs)
Here are the screenshots:
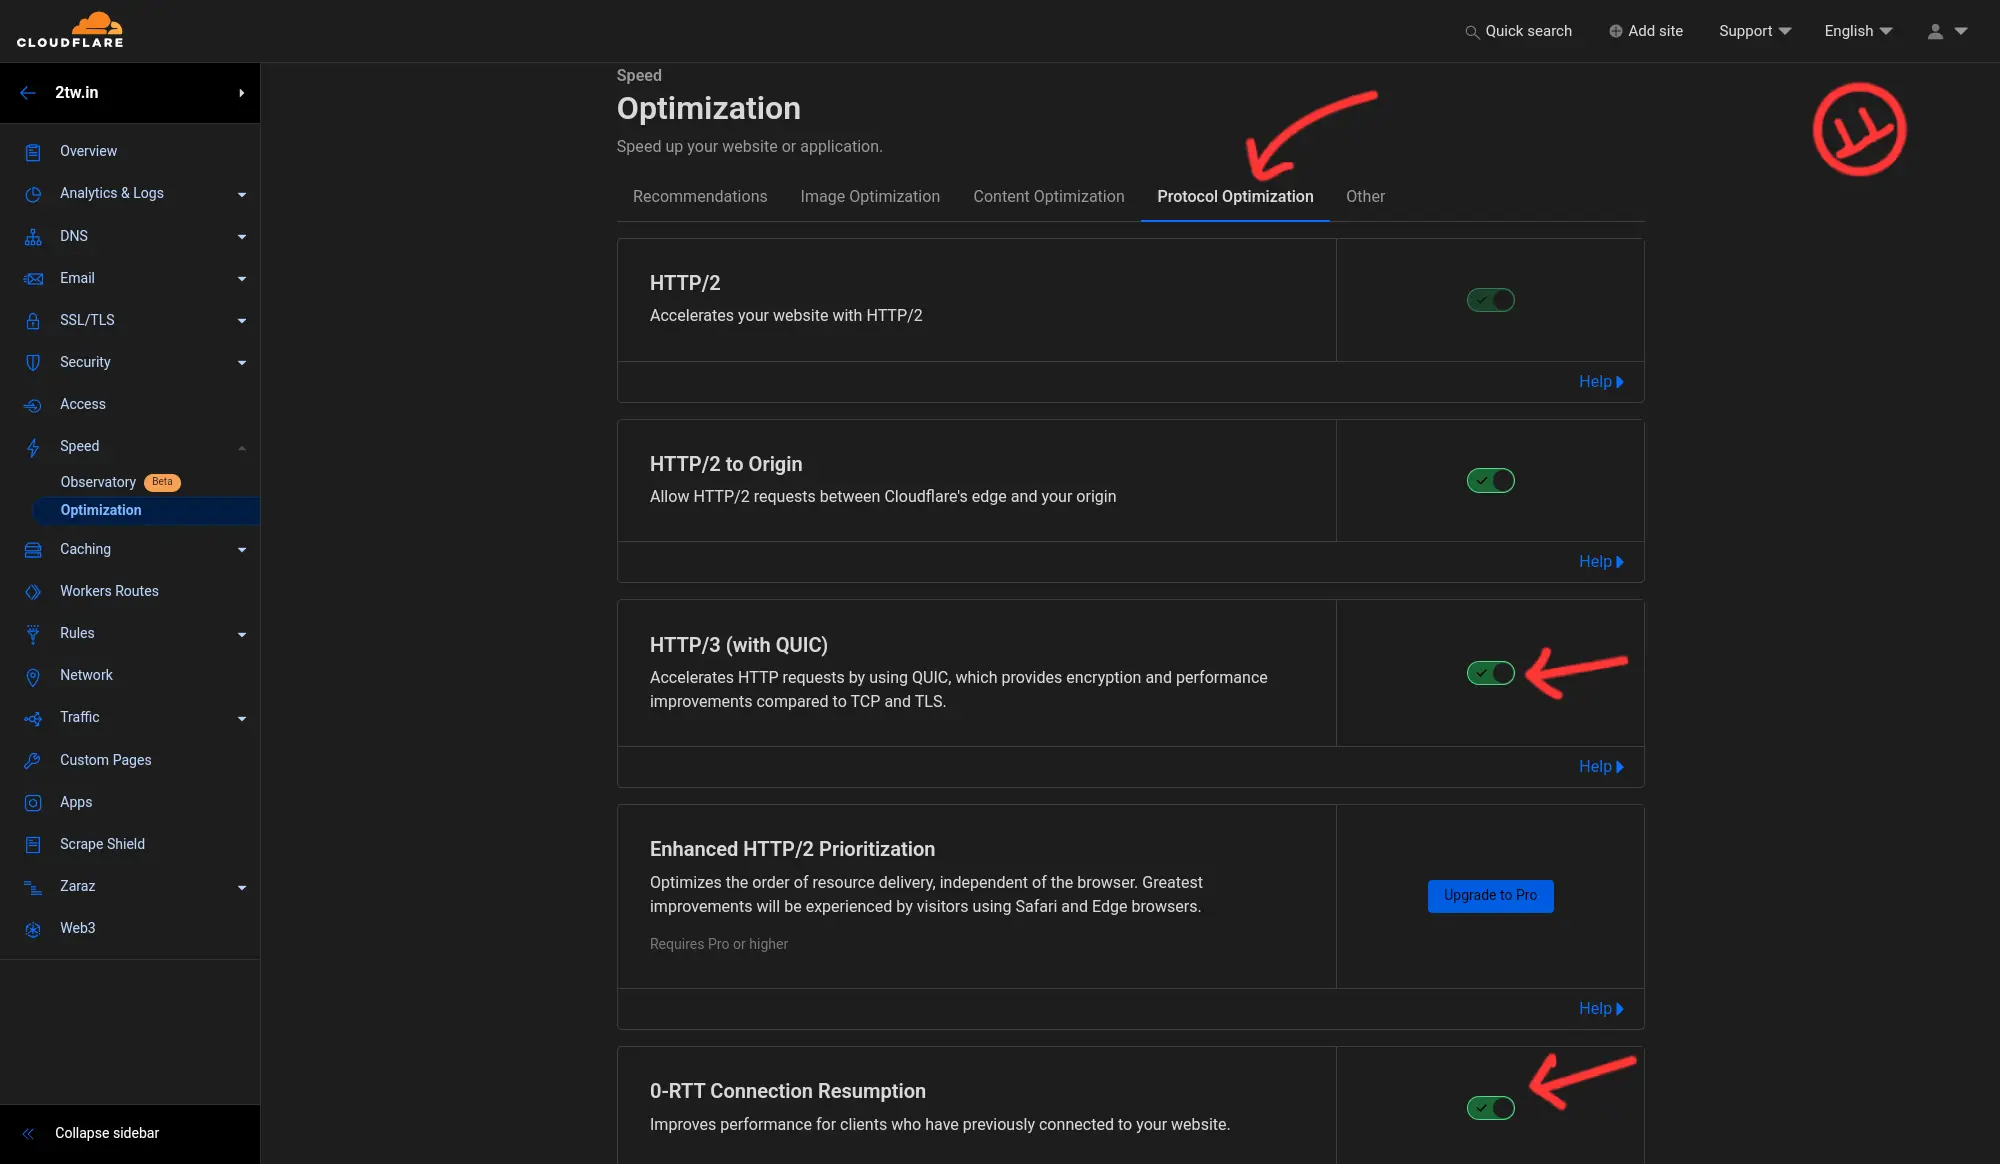
🌟 Protocol Optimisation settings:
This is the final step of this optimisation guide. In this step we are going to optimise how the users are going to connect to your website (behind the scene). That is http protocols etc. The settings we are changing are:
- https (With QUIC): This technology in itself deserves its own post but in nutshell, on http2 your users connect with your site using secure TLS over TCP protocol which is an one-way communication protocol and requires 3 request round trips between the user device and the server to establish a secure connection. In http3 the request uses UDP protocol (which is bidirectional) with TLS. Thus the initial 3 round-trip reduces to 1 trip. Which reduces connection time massively. So turn this one on.
- 0-RTT connection resumption: Which means 0-round trip time. That is if a user has previously connected to your site using quic protocol then next time that user visits you site, it will eliminate that 1 round trip too I discussed above. So it further increase the speed of your website.
This are the besic initial settings you should change in your cloudflare site after the setup.
Conclusion
There are many other settings in Cloudflare for specific usecases, which are more advanced settings and I will discuss all of them separately in future posts. But this are the basic settings you should follow after you add your site to Cloudflare. I intentionally made this post long to make it detailed and easy to follow step by step with some explanations. But if you face any problem or have any suggestion for me to improve feel free to comment down below and subscribe to the newsletter to receive new post notifications. Here I am going to post about many cool things with Cloudflare along with other things. Thank you for reading The TechWeirdo and have a good day.